How to Seamlessly Add a Headboard to Your Bed Frame: A Complete Step-by-Step Guide
Feeling like your bedroom is missing that finishing touch? A headboard can dramatically transform the look and feel of your space, adding style, comfort, and a sense of completeness. But if you’ve never tackled attaching one before, the idea might seem a little daunting. Don’t worry, it’s a common and surprisingly simple home improvement project!
This detailed guide will walk you through how to add a headboard to a bed frame with confidence, making your bedroom dreams a reality. We’ll cover everything from preparation to the final touches, ensuring a sturdy and stylish result.
Why Add a Headboard to Your Bed Frame?
Beyond aesthetics, headboards offer several practical benefits:
- Elevated Style: A headboard instantly becomes a focal point, defining your bed and enhancing your bedroom’s decor.
- Added Comfort: It provides a comfortable backrest for reading, watching TV, or simply relaxing in bed.
- Wall Protection: It acts as a barrier, protecting your wall from scuffs, stains, and wear.
- Pillow Support: Prevents pillows from slipping into the gap between your mattress and the wall.
- Noise Reduction: Some upholstered headboards can even help dampen sound in a room.
Before You Begin: Essential Checks
Preparation is key to a smooth installation. Don’t skip these crucial steps!
-
Check for Compatibility:
- Headboard Type: Most headboards are designed to attach to a standard metal bed frame using bolts. However, some are designed for wall mounting or are freestanding. This guide focuses on attaching a headboard directly to a bed frame.
- Bed Frame Type: Standard metal bed frames typically have pre-drilled holes at the head of the bed, designed for headboard attachment. Platform beds or solid wood frames might require adapter plates or a different mounting method (which we’ll touch on but won’t be the primary focus).
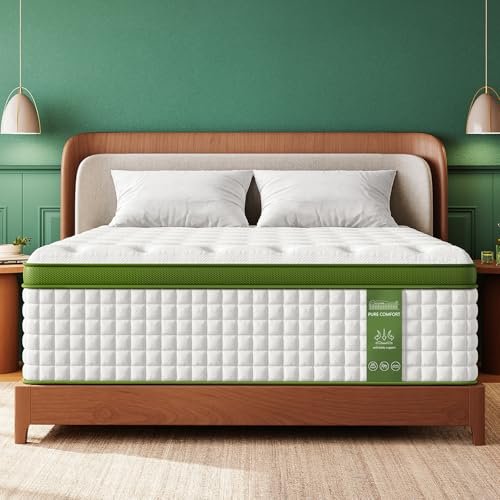
- Headboard and Frame Width: Your headboard should ideally be the same width as your bed frame (e.g., a Queen headboard for a Queen bed frame). A slightly wider headboard can work, but a narrower one will look awkward and might be unstable.
-
Measure, Measure, Measure!
- Headboard Width: Measure the total width of your headboard.
- Bed Frame Width: Measure the width of your bed frame at the head.
- Bolt Hole Spacing (on Headboard): Measure the distance between the two vertical sets of bolt holes on your headboard.
- Bolt Hole Spacing (on Bed Frame): Measure the distance between the bolt holes on your bed frame’s headboard brackets. These measurements are critical to ensure your headboard lines up correctly. If they don’t match, you might need adapter plates (also known as headboard extension brackets or modification plates).
-
Identify Existing Holes and Hardware:
- Inspect your bed frame’s headboard brackets for pre-drilled holes.
- Check if your headboard came with attachment hardware (bolts, washers, nuts). If not, you’ll need to purchase a headboard attachment kit with the correct size bolts that fit your frame’s holes. It’s best to have bolts that pass all the way through the headboard’s connection points and the frame’s holes, with enough threading left for a washer and nut.
Tools You’ll Need
Gathering your tools beforehand will make the process much smoother.
- Measuring Tape: For all those important measurements!
- Adjustable Wrench or Socket Wrench Set: To tighten nuts and bolts.
- Screwdriver (Phillips or Flathead): Depending on your specific hardware.
- Pencil or Marker: For marking if needed.
- Level: To ensure your headboard is perfectly straight.
- (Optional) Drill: Only if you need to create new pilot holes for non-standard installations (exercise extreme caution if doing this).
- (Optional) Helper: An extra set of hands makes positioning much easier, especially for larger headboards.
Step-by-Step Guide: How to Attach a Headboard to a Bed Frame
Let’s get started!
Step 1: Prepare Your Workspace
- Clear the Area: Move your mattress and box spring (if applicable) away from the bed frame’s head. You need easy access to the attachment points.
- Protect Your Floor: Lay down a blanket or rug if you’re working on a hard floor to prevent scratches.
- Unpack the Headboard: If new, carefully unbox your headboard and lay out any included hardware.
Step 2: Position Your Headboard
- Stand the Headboard Up: Carefully stand your headboard upright against the wall at the head of your bed frame.
- Align Horizontally: Make sure the headboard is centered with your bed frame. Use your measuring tape to check the distance from the headboard’s edge to the wall on both sides.
Step 3: Align Headboard with Bed Frame (or Brackets)
This is the most critical step.
- Direct Alignment:
- Carefully slide your bed frame towards the headboard.
- Line up the bolt holes on your bed frame’s headboard brackets with the corresponding attachment points on your headboard. Many headboards have pre-drilled holes or metal plates with slots for bolts.
- Adjust height: Some bed frames and headboards offer multiple height settings for the attachment points. Choose the height that best suits your mattress and box spring, or simply where the holes align best.
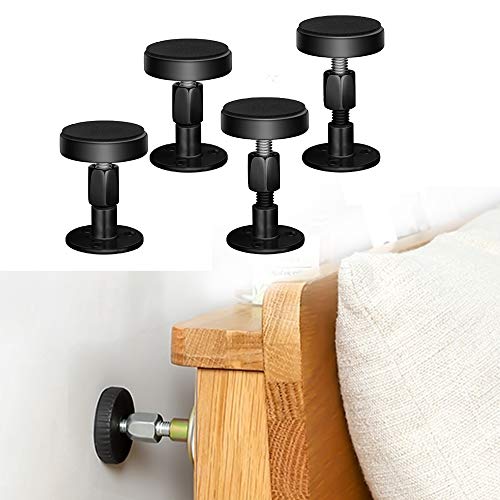
- Using Adapter Plates (if needed):
- If your headboard and frame holes don’t align perfectly, you’ll need adapter plates.
- First, attach the adapter plates to your bed frame’s headboard brackets using the bolts, washers, and nuts. Tighten these securely.
- Then, align your headboard with the new attachment points on the adapter plates. This allows you to bridge the gap or mismatch in hole spacing.
Step 4: Secure the Headboard
- Insert Bolts:
- Once everything is aligned, insert the bolts through the holes. Typically, you’ll push the bolt through the bed frame bracket first, then through the headboard’s attachment point.
- Use washers: Place a flat washer and then a lock washer (if included) onto the bolt on the inside of the headboard (where the nut will go). Washers help distribute pressure and prevent loosening.
- Tighten Fasteners:
- Thread the nut onto the bolt.
- Hand-tighten all bolts first. Do not fully tighten any single bolt until all of them are in place. This allows for minor adjustments.
- Use your wrench to gradually tighten all bolts. Work diagonally or in a criss-cross pattern, tightening each bolt a little at a time until they are snug and secure.
- Do not overtighten! Overtightening can strip threads, damage the headboard or frame, or cause the wood to split if your headboard is solid wood. Aim for firm and stable, not excessively forced.
Step 5: Check for Stability and Level
- Wiggle Test: Gently push and pull on the headboard to check for any wobbling or instability. If it moves, re-tighten the bolts.
- Use a Level: Place a level across the top of the headboard to ensure it’s perfectly straight. If it’s off, you might need to slightly loosen some bolts, adjust, and then re-tighten.
Step 6: Finalize and Enjoy
- Re-position Mattress and Bedding: Once you’re satisfied with the headboard’s stability, slide your mattress and box spring back into place.
- Make Your Bed: Arrange your pillows and bedding.
- Admire Your Work! Take a step back and enjoy your newly enhanced bedroom.
Troubleshooting & Helpful Tips
- Gap Between Headboard and Wall: If your headboard isn’t perfectly flush with the wall, it might be due to baseboards. This is usually fine, but if it bothers you, consider using felt pads or rubber shims behind the headboard’s legs where they meet the baseboard to push the top flush.
- Wobbly Headboard After Tightening: Double-check that all bolts are firmly tightened. If it still wobbles, consider adding extra washers or shims where the headboard connects to the frame to eliminate any small gaps.
- No Pre-Drilled Holes on Headboard (Rare): If your headboard has no visible attachment points and you’re sure it’s meant to connect to a frame, you might need to carefully drill pilot holes. This is advanced and should only be done if you are confident in your skills. Otherwise, consider wall-mounting or using a freestanding headboard bracket system.
- Enlist a Helper: For larger or heavier headboards, an extra person can make aligning and securing much easier and safer.
- Read Manufacturer’s Instructions: Always consult any specific instructions that came with your headboard or bed frame. They might have unique recommendations.
- Protect Yourself: Wear gloves if you have sensitive hands or are working with rough edges.
Common Mistakes to Avoid
- Skipping Measurements: Assuming your headboard will fit without measuring is a recipe for frustration and extra trips to the hardware store.
- Ignoring Compatibility: Not all headboards fit all frames. Verify the connection method before you buy.
- Over-tightening Bolts: This can strip the threads of bolts or nuts, damage the headboard, or even crack wood. Tighten until snug and stable, not until it resists further turning.
- Under-tightening Bolts: Loose bolts will lead to a wobbly, noisy, and potentially unsafe headboard.
- Drilling Without Checking: Never drill into your headboard or frame without knowing what’s behind the surface. You could hit wires, internal support structures, or damage the finish.
- Ignoring a Wobble: A small wobble can become a bigger problem over time. Address any instability immediately.
Frequently Asked Questions (FAQs)
Q: Can any headboard attach to any bed frame?
A: No, not always. While many are designed for standard metal frames, compatibility varies. Always check measurements and attachment methods (bolt-on, wall-mounted, freestanding) before purchasing.
Q: What if my bed frame doesn’t have holes for a headboard?
A: If your frame lacks headboard brackets or holes, you have a few options:
* Adapter plates: These can often create attachment points where none exist.
* Wall-mounted headboard: Attach the headboard directly to the wall behind your bed.
* Freestanding headboard: Some headboards are designed to simply stand on their own, held in place by the bed.
Q: Do I need special tools to attach a headboard?
A: Typically, no. Basic hand tools like a wrench, screwdriver, and measuring tape are usually sufficient.
Q: How long does it take to add a headboard?
A: With proper preparation, most headboard installations can be completed in 30-60 minutes.
You’ve done it! With a little preparation and careful execution, you’ve successfully learned how to add a headboard to a bed frame. Now, step back, admire your handiwork, and enjoy the enhanced comfort and style your new headboard brings to your bedroom. Sweet dreams in your perfectly appointed space!
Frequently Asked Questions(FAQ)
Q1: What are the primary methods for attaching a headboard to a bed frame?
A1: The two main methods are direct attachment using bolts and nuts through pre-drilled holes in both the headboard legs and bed frame, or using universal headboard attachment brackets if the holes don’t align or the frame lacks pre-drilled holes. A third option, entirely separate, is wall-mounting the headboard.
Q2: My bed frame doesn’t have pre-drilled holes for a headboard. What should I do?
A2: If your bed frame lacks pre-drilled holes, the most common solution is to use universal headboard attachment brackets. These brackets are designed to clamp onto the bed frame’s side rails or leg supports, providing a secure point to bolt your headboard onto. Alternatively, if your frame is wood, you could carefully drill your own holes, but this requires precision.
Q3: What tools and hardware will I typically need to attach a headboard?
A3: You’ll generally need a wrench or socket set, and sometimes a screwdriver, to tighten bolts and nuts. For hardware, you’ll need bolts, washers, and nuts that are compatible with the holes in both your headboard and bed frame. If using universal brackets, they usually come with their own necessary hardware. A measuring tape can also be useful for alignment.
Q4: My headboard holes don’t align with my bed frame holes. Is there a solution?
A4: Yes, this is a very common issue due to varying manufacturing standards. The best solution is to use universal headboard attachment brackets. These adjustable metal brackets are designed to bridge the gap between misaligned holes, allowing you to securely connect your headboard to the bed frame without needing to drill new holes into either component.
Q5: Can I attach a headboard directly to the wall instead of the bed frame?
A5: Absolutely. Wall-mounting is a popular and often preferred alternative, especially for heavier or very tall headboards, or if you want a ‘floating’ look. It typically involves using a French cleat system, mounting plates, or direct bolting into wall studs. This method makes the headboard independent of the bed frame, offering greater stability and preventing wobbling.
Q6: How do I ensure my headboard is stable and doesn’t wobble after attachment?
A6: To ensure stability, first, make sure all bolts, nuts, and screws are tightened securely, but avoid overtightening which could damage the materials. If using universal brackets, ensure they are firmly clamped. If the headboard still wobbles, consider adding shims between the headboard legs and the bed frame at the attachment points, or using additional support brackets. Wall-mounting generally offers the most inherent stability.
Q7: Is it possible to attach a different size headboard (e.g., a Queen headboard) to a different size bed frame (e.g., a Full or King frame)?
A7: While technically possible, it’s generally not recommended for aesthetic and stability reasons. A Full headboard is narrower than a Queen, and a King headboard is wider. Using universal adapter plates might bridge small gaps, but significant size differences will result in the headboard extending beyond or falling short of the bed frame’s width, which can look awkward and compromise stability. Wall-mounting offers more flexibility for positioning but doesn’t solve width discrepancies.
Q8: What types of headboard attachment brackets are available, and how do they differ?
A8: The most common types are universal attachment brackets, typically made of heavy-gauge steel. They differ mainly in how they attach to the bed frame: some clamp onto the frame’s side rails, some bolt to the existing frame legs, and others are designed to extend existing frame mounting plates. They also vary in their adjustability (height and width) to accommodate different headboard hole patterns.
Q9: How high should I attach my headboard to the bed frame?
A9: The ideal height is largely a matter of personal preference and depends on your mattress and box spring height. Generally, you want the bottom of the visible headboard to sit just above the top of your mattress, or mattress and box spring combination, to prevent a gap and ensure it’s aesthetically pleasing. Many headboards come with adjustable height settings on their legs to accommodate this.
Related Articles
7 Top Full Size Bed Frames: What is the Dimensions of a Full Size Bed Frame and More!
Getting a good night’s sleep often starts with the right bed, and for many, a full-size bed is the perfect sweet spot between a twin and a queen…
How Much Is a King Size Sleep Number Smart Bed
How Much Is a King Size Sleep Number Smart Bed? Your Guide to Understanding the Investment Recommended Product: Select Comfort Air Bed Chamber for Sle…
How Much Does a Sleep Number 360 Smart Bed Cost
How Much Does a Sleep Number 360 Smart Bed Cost? Recommended Product: Sven & Son Classic Adjustable Bed Base — head and foot lift, massage, under-…